BroadlandAstro
OBSY and Astro Gear
This is a chronological ramble through the kit I’ve used over the years. It’s here so people can see where I started, what I learned, and what I’m running now.
First light: 130 mm Newtonian (EQ2) → CCTV “EAA”
Started with a Sky-Watcher 130 mm Newtonian on an EQ2 mount. Then I jammed a Samsung SCB-2000P CCTV camera in the focuser and did live-view EAA on bright clusters and the Moon. Grainy, wobbly, brilliant fun — it taught me framing of objects and to limit expectations.
Go-to Alt-Az + small Maksutov scope and a ST-80
I moved to a Sky-Watcher Alt-Az go-to mount with a small Maksutov (≈4″) for planets and the Moon, and kept a Sky-Watcher ST-80 in the mix. This period was about convenience and quick setup and learning the sky quickly with a go-to mount.
First real tracking: HEQ5 + DSLR
Swapped to an HEQ5 go-to mount and sold the Mak. Picked up a Canon EOS 450D and started trying long-exposure subs whilst video guiding.
OBSY v1 — My Roll-Off Observatory
I moved to the countryside ~12–13 years ago and a few years later I built my first roll-off roof observatory on a budget. It was scrappy and bodged but it taught me loads, and it enabled me to have my gear set up and ready to go all the time. I found a big shed on Freecycle (about 12×10 ft and ~2.5 m tall), stripped it with a mate, and reused the timber to build a roll-off. The roof went through iterations: started with a simple timber channel, ended up with inverted UniStrut and channel rollers. The walls were flimsy but the roof concept was solid. It kept the rain off and let me capture data in semi-controlled conditions for roughly six to seven years.
Pier v1 & DIY puck
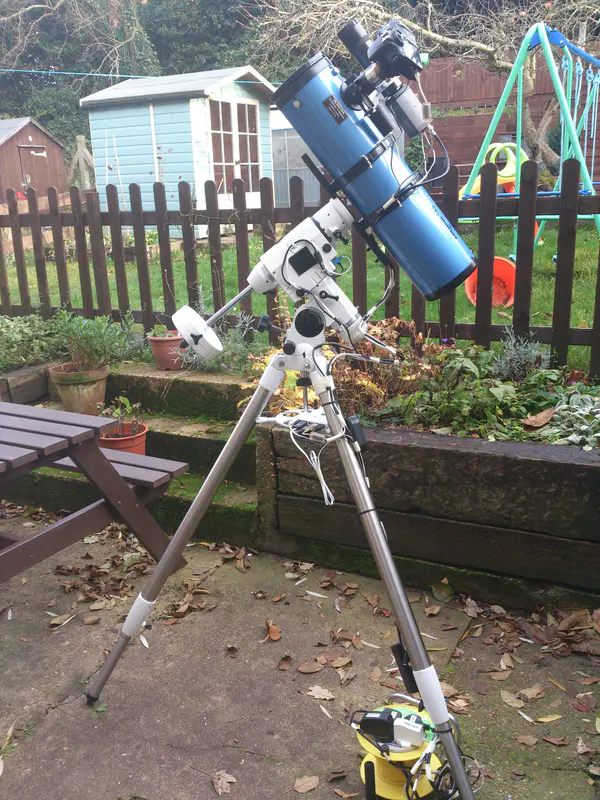
I dug a frankly ridiculous footing, filled it with rebar and concrete — and cast a ~1 m plinth on top. Then I bodged a steel pier head from long bolts and sheet metal. The “puck” for the HEQ5 was a Nissan Micra brake disc; the dimensions worked a treat. It carried an 8″ Sky-Watcher Quattro (steel) and later the Altair Astro 130 EDT. It all worked, but the structure lacked stiffness and there were definite design flaws.
Fast Newt phase: 8″ Sky-Watcher Quattro (steel)
Upgraded the 130 mm Newt to an 8″ Quattro. Faster optics meant shorter subs and more signal — but also collimation practice and balance headaches.
Planetary dabbling
Played with Altair Astro GPCAMs for planets and lunar. Good fun while clouds ruined deep-sky nights.
Mount upgrade
Sold the HEQ5 and moved to a Sky-Watcher AZ-EQ6 GT for the main rig. Later added a second-hand HEQ5 to carry a 2nd setup but that's still incomplete...just a camera to get for it now.
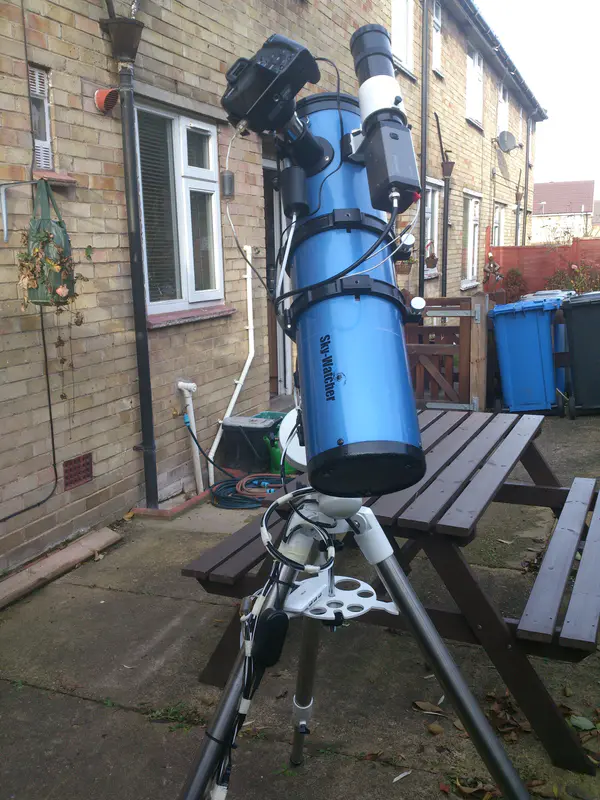
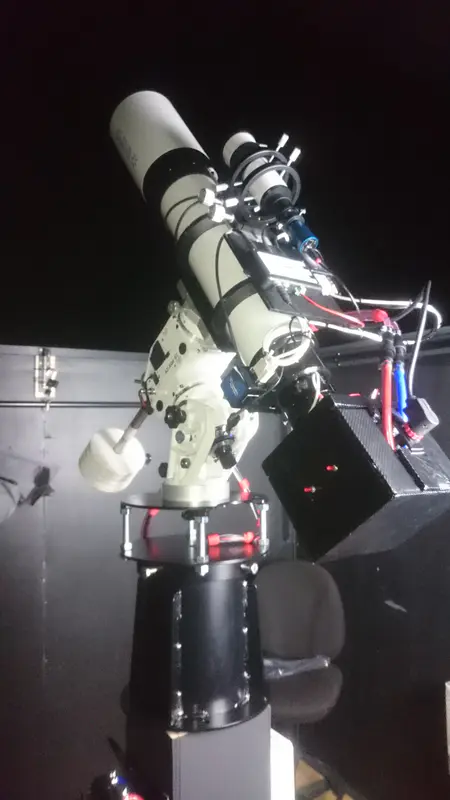
Triplet refractor era: Altair Astro 130 EDT
Moved to an apochromatic refractor (Altair Astro 130 EDT). Initially guided with the ST-80 + GPCAM, later tidied the setup with a 50 mm Altair guide scope. Lots of clean, forgiving data while I refined processing.
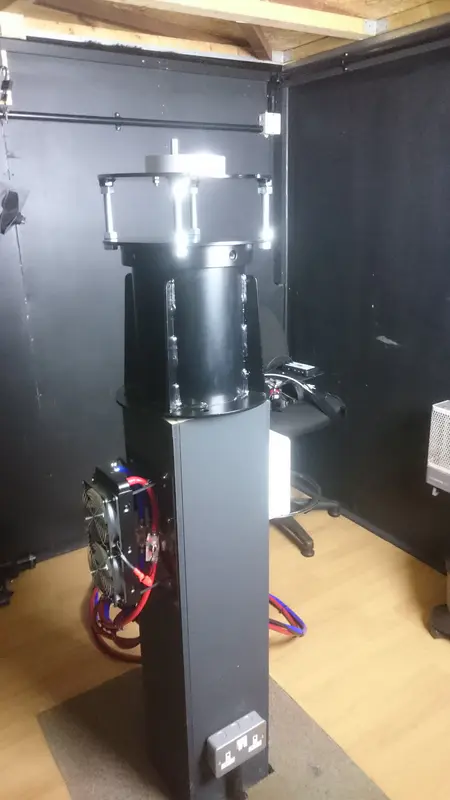
Pier v2 & cabling
I bought an Altair Astro pier, customised shorter to match the site. It sits on the original concrete, which I reshaped into an octagon — a little nod to the sideways “8” of infinity. All cables run up through the centre: no trailing leads.
The MacGyver cooling era (pre-cooled astro cam)
Before I went to a dedicated cooled camera, I Peltier-cooled my DSLR. I even water-cooled it for a while — completely overboard, but it worked and improved the data. Now that I’m on a cooled mono CMOS, that DIY rig will get repurposed as a cooled housing for my noisy ASI120MC all-sky camera.
OBSY v1.1 — Cutting a shed in half
My friend also had a telescope and liked the idea of having his scope set up permanently. He had a spare shed so we cut it in half and put the top half on rollers.

RGB CMOS (ASI1600 MC-Pro)
Bought a ZWO ASI1600 MC-Pro and ran one-shot colour for a while.
Wider field switch: Altair Astro 70 EDQ-R quad
Traded the big 130 mm refractor for a 70 mm imaging quad. On paper a downgrade; in practice, a wide-field weapon — flat field, easy stars, quick to set up.
Cooled CMOS & filters (ASI1600 MM-Pro → mono + OAG)
After using the 70 EDQ-R for a while I switched to the mono ASI1600 MM-Pro with an 8-position wheel (LRGB + narrowband). I now guide off-axis with an ASI120MM — cleaner stars, no differential flexure. Filters are CMOS-optimised ultra-narrowband (S II, Hα, O III) and LRGB for broadband.
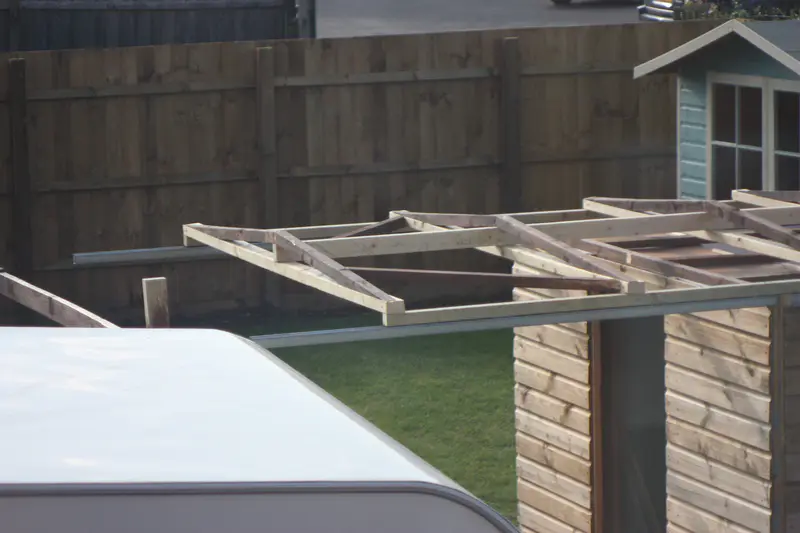
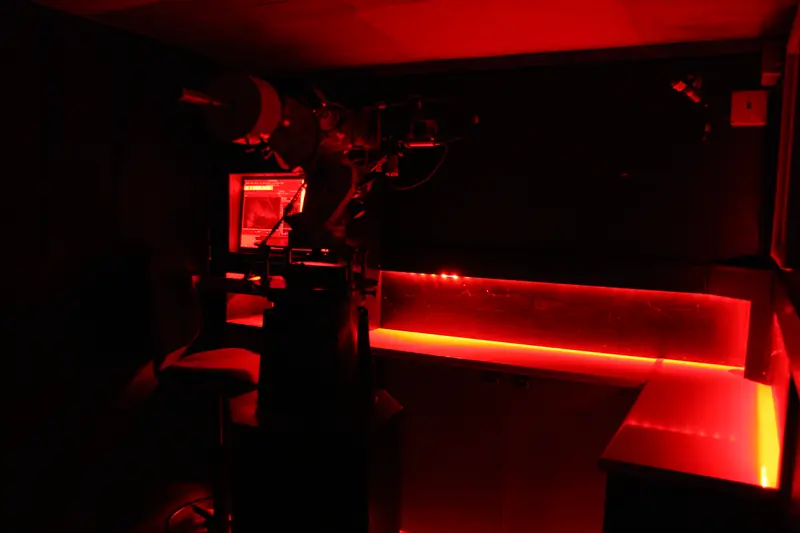
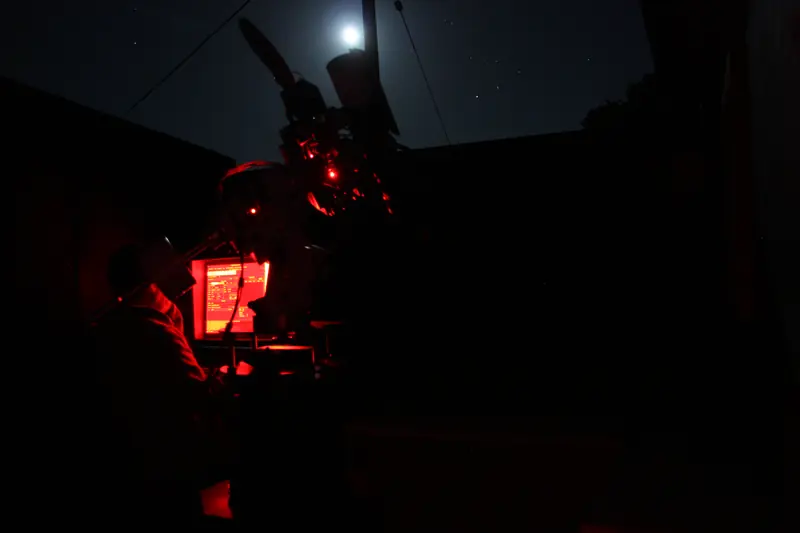
OBSY v2 — a clean redesign
A tax rebate funded a proper rebuild. I learned FreeCAD on Linux, designed the lot, and rebuilt with correctly sized structural timber and proper insulation. There’s still one unavoidable site constraint: when I took on the rest of the garden, the original pier site ended up with buildings to the south. Thankfully the roof rolls back just high enough to clear nearby trees, so I still get ~20° above the southern horizon and a decent sky window overall.
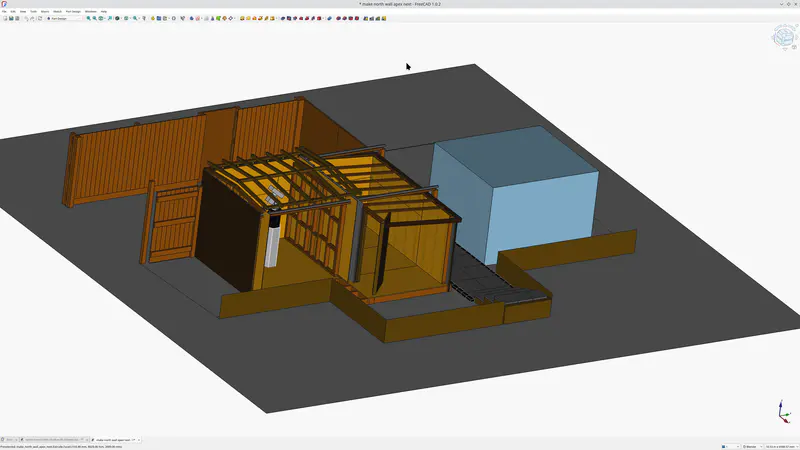
Two buildings, air gap
The warm/control room is now separate from the telescope room with an air gap between — keeps the footprint within local limits and helps isolate vibration so footsteps don’t travel into the scope room.
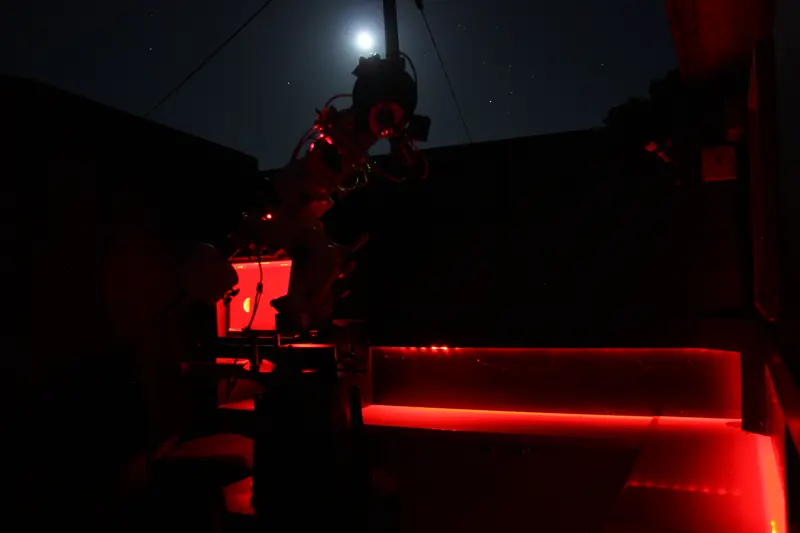
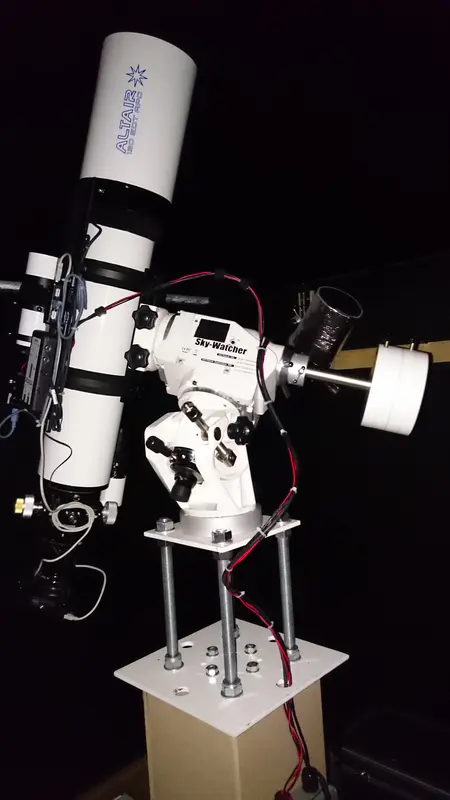
New Long FL Optics: 8″ TS-Optics Ritchey-Chrétien (CF)
Picked up a lightweight carbon-fibre 8″ RC for galaxies and small targets. Still finalising guiding and general “taming” — spacing, balance, collimation, and cable discipline are ongoing. Would like to get a dedicated camera for this rig.
Power & control
- Pegasus Ultimate Powerbox handling power distribution and dew.
- SQM module for sky quality logging.
- Raspberry Pi with INDI/KStars/StellarMate runs capture/control.
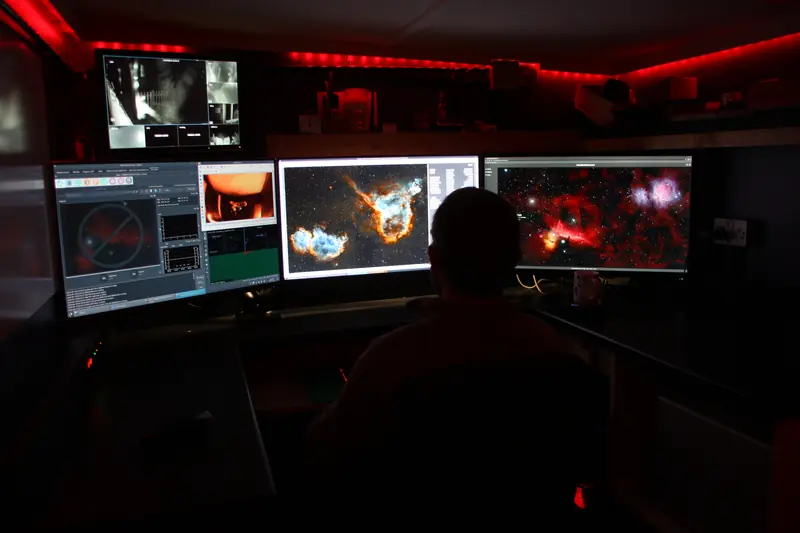
- Dedicated OBSY PC in the telescope room running KStars locally (or headless), connecting to the Pi via INDI; I remote in when needed, with a red-screen overlay to protect night vision.
- Main workstation in warm room next to OBSY with three displays for processing, imaging/monitoring, and tinkering at the same time.
Today’s rigs
- Wide-field: Altair 70 EDQ-R on AZ-EQ6 GT · ASI1600 MM-Pro + 8-pos wheel (LRGB + S II/Hα/O III) · Off-axis guiding with ASI120MM · Pegasus UPB · StellarMate.
- Long FL (build in progress): 8″ TS-Optics RC on HEQ5 · camera/filter setup as above · guiding plan TBD (likely OAG once spacing is nailed).
Flats gear
- Flip-Flat on the imaging refractor for easy automated flats.
- Wall-mounted EL grid panel (ex-ceiling light) for the RC. Brightness control is still on the to-do list.
Where it’s at today
The rebuilt OBSY is solid, insulated, tidy, and pleasant to work in. Last year I picked up a Hörmann garage-door motor and track to motorise the roof. I need to lighten (and probably raise) the roof first — planned for summer, but life intervened.